Nik Sharpener Pro 3 Tutorial
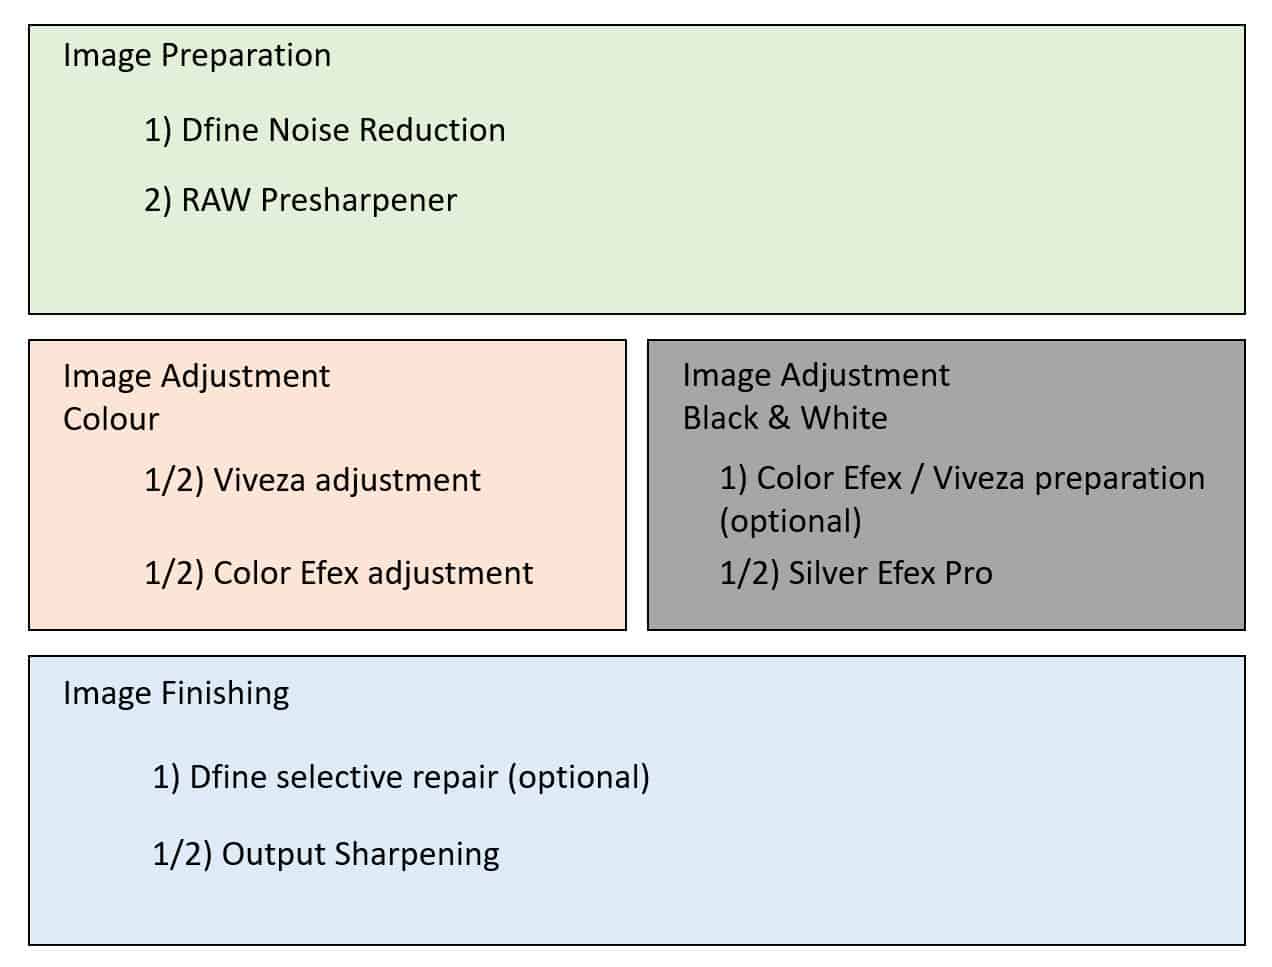
Why Presharpener and Output Sharpener Something that causes problems for a lot of Nik Sharpener Pro users are the two versions of the software. Why is there a RAW Presharpener and an Output Sharpener? Drivers for iatkos l2 iso file. More importantly, when to use each? The reason for the two versions of the software is that they work differently, and you apply them at different points in the workflow. To understand this, you first need to understand the three-stage sharpening model. Three Stage Sharpening A common misconception about sharpening is that you apply it once, as a final stage in image processing. Whilst there’s a grain of truth in this, the advice has become distorted over time.
The best way to apply sharpening is in three stages; each with a different purpose and each performed in a different way. This is the model that Nik Sharpener Pro follows. Stage 1, Capture Sharpening Capture Sharpening sharpens the fine detail in the image. You apply this at low levels to avoid exaggerating noise. It’s applied at the start of processing before making significant adjustment to the image, using the Nik RAW Presharpener.
Creative Sharpening in Nik Collection. You can use the Nik Sharpener Pro 3: Output Sharpener tool with control points to create a very precise selection of what you want to sharpen. For creative sharpening, just keep the output sharpening method set to default (display output). Sharpener Pro 3.0 - read user manual online or download in PDF format. Pages in total: 52. Summary of Contents of user guide for Nik Software Sharpener Pro 3.0 NIK-1392. User Guide Page 2: Chapter 1: Introduction.
The aim is to remove any softness in the image resulting from the image capture. Don’t use it to make the details of the image pop, just remove any softness in the fine details. Although you will apply a level of capture sharpening globally, you might apply additional sharpening to some areas or reduce it in others.
You can see an example using the Nik Sharpener Pro RAW Presharpener in the video below. Stage 2, Creative Sharpening In Creative Sharpening you apply sharpening selectively to enhance more important features in the photo. For example, if you were sharpening a portrait, you might apply additional sharpening to the subject’s eyes to make them more prominent. You apply creative sharpening after adjustments to improve colour, tone or add special effects. It’s used as a final step in the processing of the image. Importantly, if you’re going to be resizing your image, it’s applied after the resizing. If you don’t, the resizing can reduce or exaggerate the sharpening effect depending on if you’re or increasing or reducing the image size.
Creative sharpening’s applied selectively, and the sharpening routines used are stronger than in Capture Sharpening. This helps to emphasise the fine details in the photo. It also helps to add a feeling of depth to the image. You apply Capture sharpening in the Nik Sharpener Output Sharpener.
The Nik software has combined this stage with the Output Sharpening stage discussed next. This makes sense because you apply both as a final step of image processing. Stage 3, Output Sharpening The output sharpening stage addresses any additional sharpening you might need to make the image appear at it’s best. This is easiest to understand when you consider inkjet printing. When you make a print using an inkjet, the ink sprays onto the paper and soaks into the surface.
As part of this there is some bleed or spreading of the ink which causes the image to soften. Output Sharpening addresses this softening effect.

In this video I demonstrate both Creative and Output Sharpening using the Nik Output Sharpener. Summary Once you understand the three-stage sharpening of a photo, Nik Sharpener Pro makes a lot more sense. In the videos you will have seen to adjust the global sharpening in both the RAW Presharpener and Output Sharper.
Good use of the Nik Control Points is one of the secrets to achieving professional results when sharpening photos. The other is to apply your sharpening at the correct point in the image processing workflow.
You can learn more about the recommended workflow when using the Nik Collection in my article describing. Also take a look at the for more Nik Collection tutorials. Learn more about how to use specific plugins in the Nik Collection through. Some of these are.